

get it by typing

Every guitar project eventually hits a snag. Yesterday I hit one, big time. While I was attempting to put back bow on the neck I exerted too much torque and snapped off the threaded end of the truss rod. I was following instructions but somehow the neck was either too stiff to bend, or there was something else wrong. In any case I won’t be doing that again. This truss rod comes with instructions to glue it into the channel with epoxy. In my view all this did was prevent the thing from bowing. Other suppliers indicate that some builders do not glue this rod in. I may go that direction next. My supplier is sending a new rod, but the neck and all the work that has gone into it is now wasted.
This is most annoying because I had the neck joint fitted perfectly. This involved lots of chiseling, filing and sanding, and a multitude of checking for proper angles both vertically and horizontally.
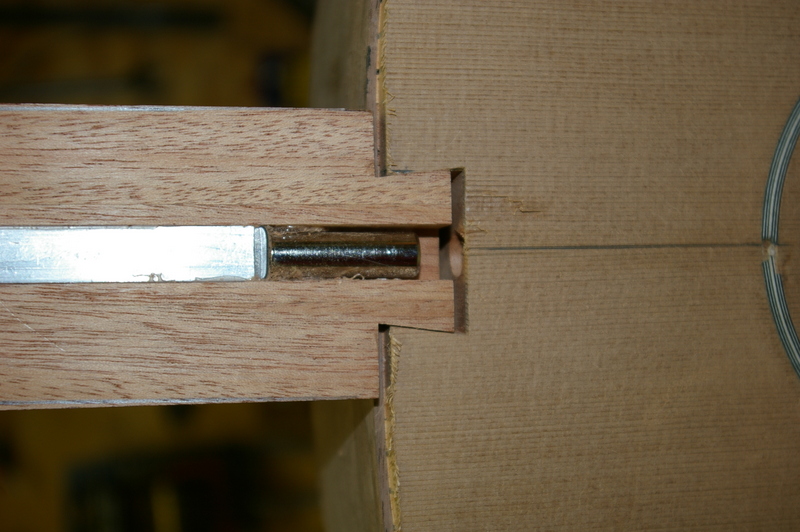
neck showing truss rod barrel nut
In the meantime I have begun a new neck by cutting up another mahogany 1×4 board, band sawing and gluing up three more pieces.
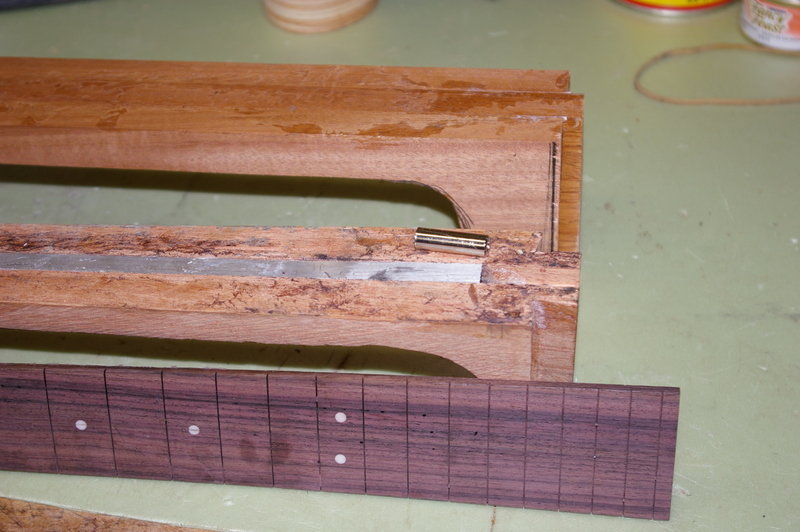
Neck with broken barrel nut, and new neck blank in background
My first reaction was to glue on the fingerboard and try it with the truss rod as is, whereby it would be at least a passive reinforcement. But then this morning I reconsidered. So I removed the fingerboard with the aid of a heat lamp and some steel scrapers.

removing the fingerboard
I still don’t have the answer as to why this thing didn’t bend in the first place. Plus I am not confident that this particular truss rod is the best quality. I may go to a different source for a better one, i.e. one made in Japan. My supplier does not say who makes their truss rods. Form your own conclusions.
But other work is progressing. Today I bent the bindings on the hot pipe. There are four pieces, made of rosewood with white/black/white pinstripe laminations on the bottom edge. I then taped them to the binding channel that was previously cut, and let them dry in place.

hot pipe ready to bend binding
Later I applied glue and taped them on. I use lots of tape to ensure that the binding is pressed tight into the channel. One particular place that is often problematic is at the waist of the back, because here the binding channel takes a bend downwards. The twist induced causes the binding to want to pull away from the guitar. So I added a heavy duty clamp to force it into place. Once one side of the back is dry I will do the other side.
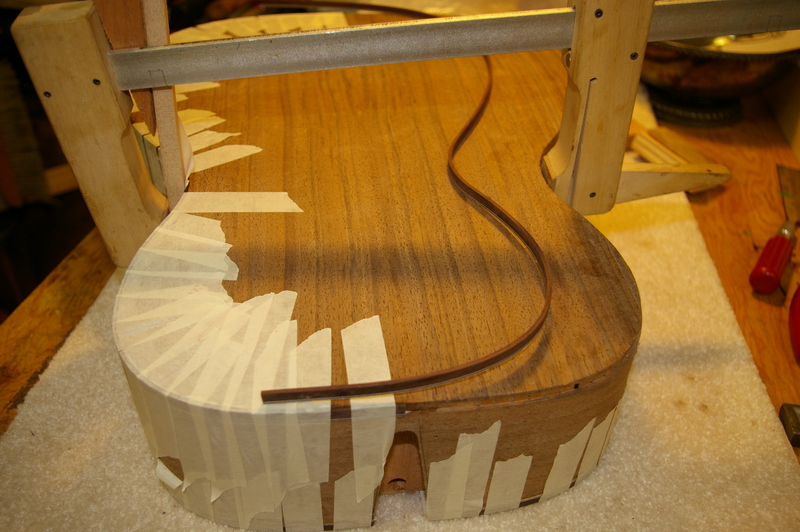
installing bindings
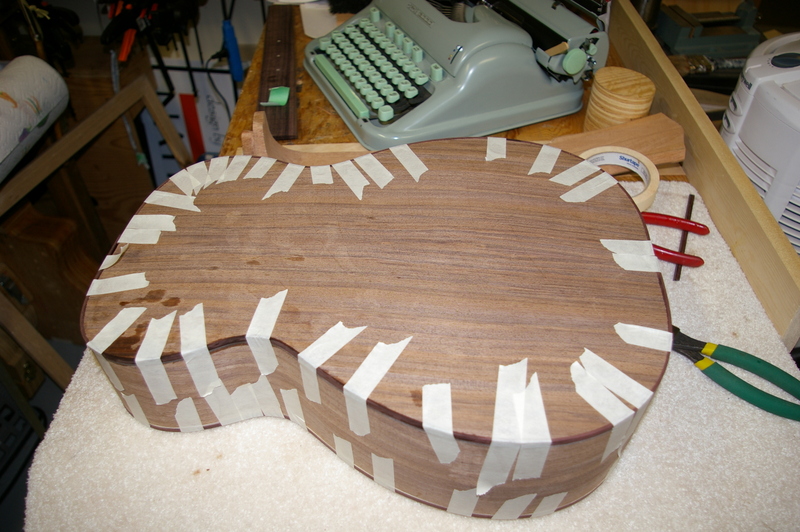
bindings drying in place before gluing – (note Hermes 3000 typewriter in background – received as Christmas present)
A final note, but not about guitars. Above you see a Hermes 3000 typewriter. This was given to me by my brother & sister in law for Christmas. It belonged to the late father of my brother in law. I have to extol this machine as probably the finest typewriter ever made. I’m not saying that it’s everyone’s favorite, but I guarantee that if you have a look inside at the works you will see a true wonder of the finest precision Swiss engineering and manufacturing. I’m keeping it close at hand as inspiration while I build this guitar. It is a reminder of the meaning of quality.
Filed under Guitars, Typewriters
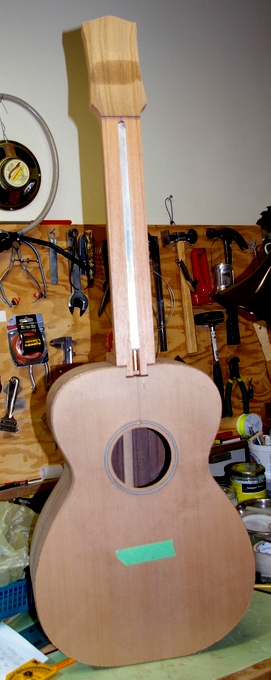
neck dry fit to body
Since last time a lot of work has been done. First thing was I dimensioned the neck. Most of this was done on the belt sander. With a heavy grit belt I let the machine grind away a lot of excess wood. Slowly but surely I got close to the final thickness of the neck and the headstock. I then glued on the head plate veneer, and rough cut the head profile. But before all this I had to plane the fingerboard to the proper width. Two dimensions here are critical: the width at the nut (fret 0) and at the body joint (fret 14). I use fairly common widths of 44 and 55mm respectively. It’s critical to get the neck taper perfect so I do it very slowly and carefully. It also must be symmetrical about the centre line.
Once the fingerboard was the right width I positioned it on the neck and clamped it in place. Then I put the bone nut where it goes, loosely, and finally glued on the head plate veneer. The head plate veneer is a thin walnut piece left over from the back plate.
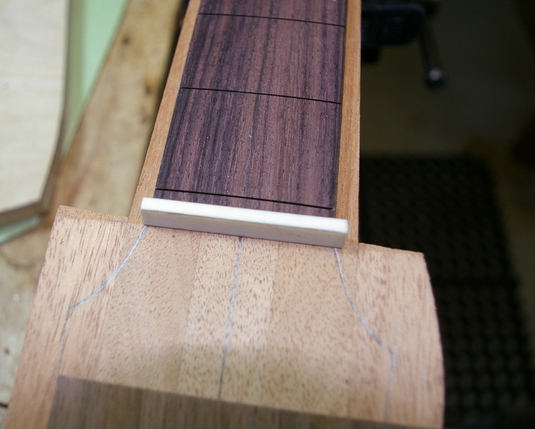
dry fitting the fingerboard, nut and head veneer

head veneer glued and clamped
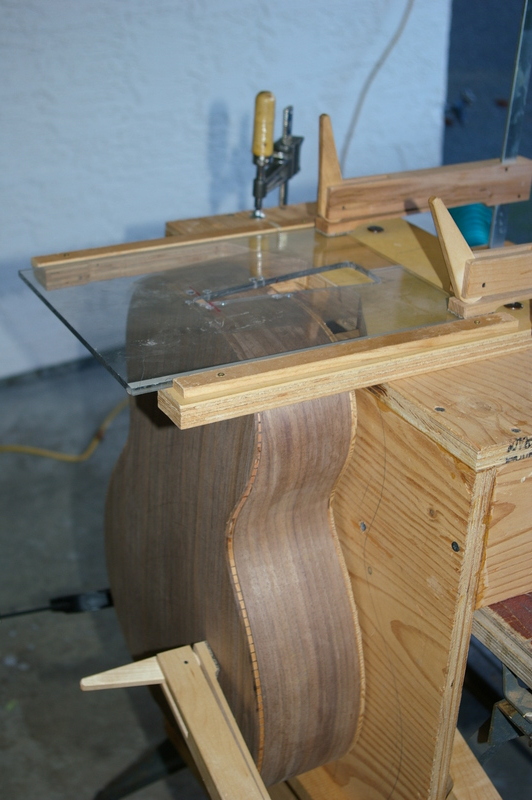
I let the veneer glue set for a while and proceeded to the body. I had previously glued on the back, which is very much the same process as the top, seen on earlier posts. I trimmed off the excess overhanging wood with a hand saw first and then a router. Cutting the binding channels was next. For this I have a jig made up of a laminate trimmer (small router) in a “drill press”. The drill press is one of those things made for a hand drill. I converted/modified it to hold the router. The carrier slides on a vertical pipe. I use a few elastic bands to reduce the weight of the whole moving section, so that it doesn’t rest too heavily on the guitar and make grooves in the top plate. The router has a built in bearing for the width of cut, and has a moveable plate to set the depth. Once set and tested on a scrap piece it’s time to route. I have a “sled” for the body, which is a piece of plywood that holds the body steady and more or less level. This is fed into the router.

binding cutting jig
I cut channels in the back and the top and moved on to the next major routing event – cutting the female neck joint cavity in the body. Out comes the dovetail jig unit, this time with the body template. This is a piece of acrylic with the cavity shape in it. It gets nailed with tiny brads to the body. The holes will not be seen once the neck is installed. This is a very precise procedure. All measurements and angles are checked two or three times. The routing takes only a few seconds however. This time it worked perfectly. The neck fit quite tightly into the cavity. Later it will be final fitted, but for now I’m pleased with the initial cut.

neck cavity template detail
neck cavity router setup

cutting the headstock outline

ribs in mold with neck block, tail block & lining for top in place
After bending the ribs I had to trim them to length and fit them into the mold. The mating ends have to match perfectly so the seams are tight and the ribs remain in the same plane. Once all is measured and dry fit the interior blocks are glued in. I did this one at a time. Notice that the ribs are spread. They require a bit of force to push them to the inner faces of the mold, not much but enough to keep everything square. It always takes a few tries and some checking to ensure that this step keeps the ribs from tilting off plane.
Next I glued the linings onto the edge that will be the top. They are glued a trifle proud of the edge and afterwards planed to level. Once this was done I dry fit the top. The main objective here is to have the top fit tight to the ribs without obvious gaps. Once that was ready it was time for the next big step – attaching the top to the ribs.

ribs in mold and sitting on a cantilevered workboard
I use a cantilevered workboard, which is a piece of plywood in the shape of the mold. The mold sits on this, and the top will be attached and roped into place.

top dry fit to ribs before gluing
Once it looks like everything is fitting together perfectly it’s time to glue. With the ribs and mold sitting on the cantilevered workboard I apply glue to the linings and clamp the neck end down. The main thing now is to be sure the top is centered on the ribs. Of course I have made some pencil lines for this, but once the glue begins to grab you don’t have very long to make adjustments. There is a lot of surface area here and the glue starts to hold quite rapidly. Having dry fit the whole thing several times it makes the process a lot smoother. After first clamping the two ends it’s time to rope.

ribs and linings with glue applied, ready for the top plate
Roping is an old term from the days when they actually tied the tops on with rope. I use a giant rubber strip, which is simply a long piece of inner tube made from a truck tire. It’s one inch wide and very long. I start at the waist, because this area also has to be bent down to contact the ribs, due to the arch in the top plate. It goes down easily, as the top is fairly flexible at this location, having no bracing there. Once it’s all roped up the job is done. I’ll leave it a good few hours just to be sure it holds well. Note that I removed the clamps at the ends once the roping was underway and the top was stabilized in place.

top plate roped to rib assembly with long rubber strip
top with bracing complete
My top bracing for this guitar is arched. There are only 3 major braces. The transverse one at the top is for strength mainly, so it is 19mm high. It has a hole in it for accessing the truss rod adjustment. The main X-brace is smaller, and tapered down to zero at the ends. This is where the sound is produced, so it has to be a balance between strength and flexibility. The three pieces around the sound hole are off cuts from the top, thin pieces to strengthen the area of the hole against possible breaks.
I also did some spectrum analysis of the plates, using the computer. I hold up a plate to a microphone and give it a dozen taps with a felt covered hammer, similar to a piano hammer. I use a free program called Audacity for this. It has a function to analyze the spectrum of a recording. This shows me a graph (logarithmic) which gives an idea of the peaks and relative strengths of various frequencies. There’s a lot of unsubstantiated hokum around tap tuning, but I do this more out of curiousity than anything. Then I export the results to a text file, import this to Excel, and then generate a graph. This will show me the dynamic range. I then plot a trendline which gives a better overview of the response. But after all is said and done I shave the braces until it sounds good, and is still stiff enough. Better to stop before it’s too late. The top has to support the strings or it’s all over, structurally speaking.

spectrum analysis of the top
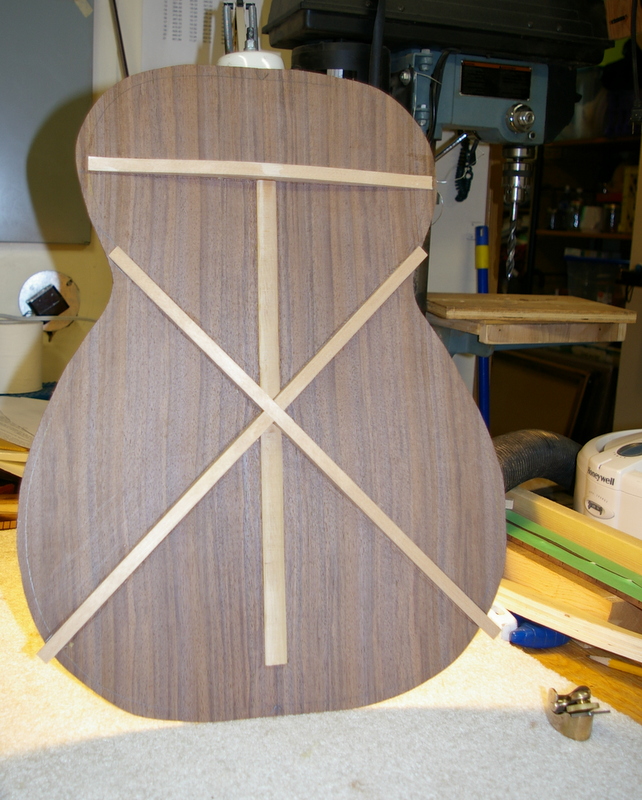
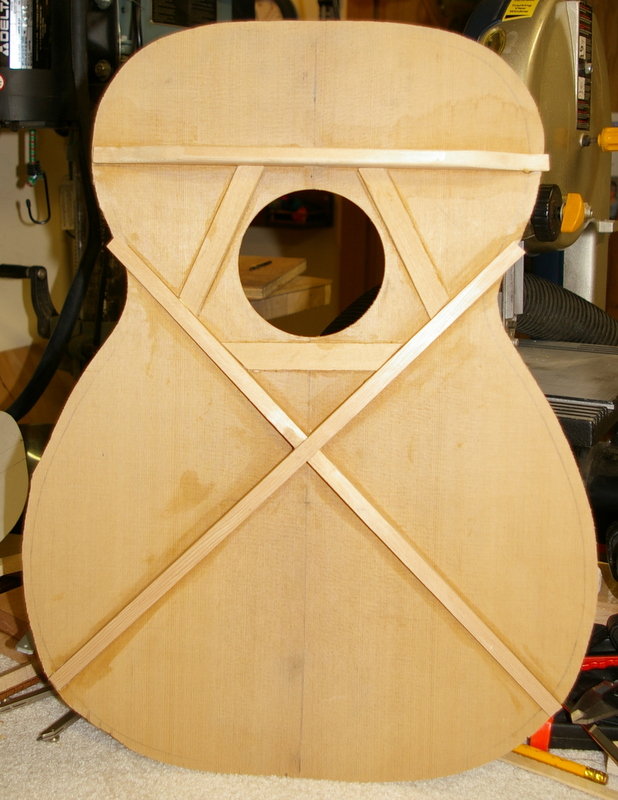
back bracing complete
I’ve also done the back. I shaved the braces to drop the fundamental frequency as low as I dared. The back however, unlike the top, doesn’t carry any downward pressure, so the braces can be lighter. Hardwoods are always lower in tone than softwoods, simply due to their density. This back plate is several whole tones lower than the top plate. The bracing design is identical to the top, same arching, same locations. The back braces do not taper to zero however. They are let into the linings at the perimeter. The centre strip is merely a precaution to reinforce the centre joint. Many guitars do not have this, but it doesn’t affect the sound so I put it in.

side bending setup – aluminum pipe with bbq lighter inside
Once the plates were done I bent the sides (ribs). I made a template from thin MDF, and marked off 25mm hash marks on it. Then I marked the sides with a yellow pencil at 25mm spacings, and labelled them. This helps immensely with bending. I have the bending pipe clamped in the vise and an old BBQ lighter which has been squeezed when hot, shoved inside the pipe. This is controlled by a light dimmer. Full power would be much too hot. I run it around 50-60%. The bending is not hard once you get a feel for the wood. It takes patience, however. This guitar is made of Black Walnut, which bends very well. Some wood is horrible to bend, like Paduak. Once each side is bent to the profile of the template within 2-3mm tolerance, it gets clamped into one half of the mold. The mold splits in two for this purpose. The sides are bent wet, and the steam generated by contact with the pipe softens the wood so it bends. I use a spray bottle to keep the wood wet. It dries out very fast once in contact with the pipe.

side piece clamped in mold until it dries
Filed under Guitars
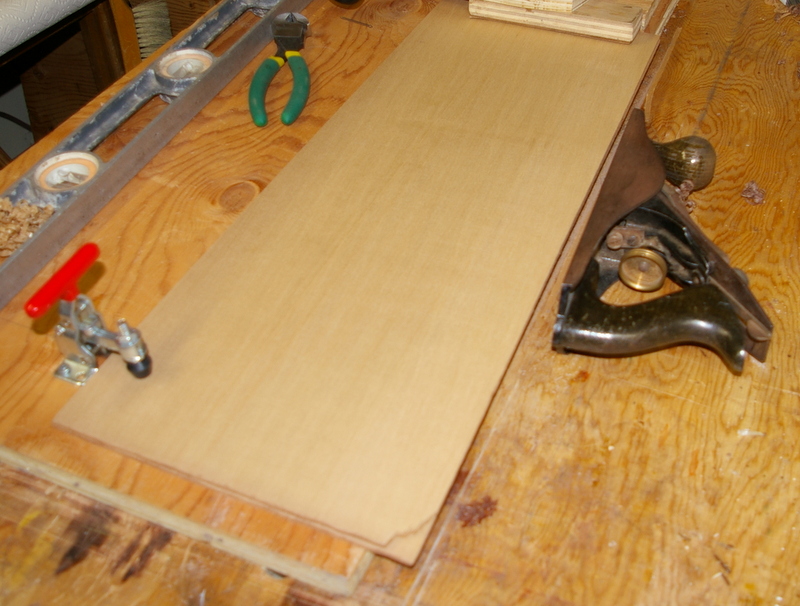
plate joining jig
The post office delivered the wood on Sunday. Only at Christmas time. So I got to work and joined the top and back plates. For this I use a jig known as a shooting board. I find it hit and miss, but eventually with enough planing and sanding with a long straight edge the two pieces matched. To test if they do in fact match, you only have to hold them up to a bright light, edges together. Any defects will shine through.
After I joined the plates I tackled some other sundry tasks. One was to put the neck dots in the fingerboard. This is done by drilling holes and stuffing in round plastic rod. The plastic is immersed in acetone for 30 seconds, during which time it begins to dissolve on the outside. Then you push it into the holed and snip it off. Later when it hardens up again it will be sanded down flush. After this I marked and trimmed the fingerboard to a rough taper, with an extra millimeter on each edge.
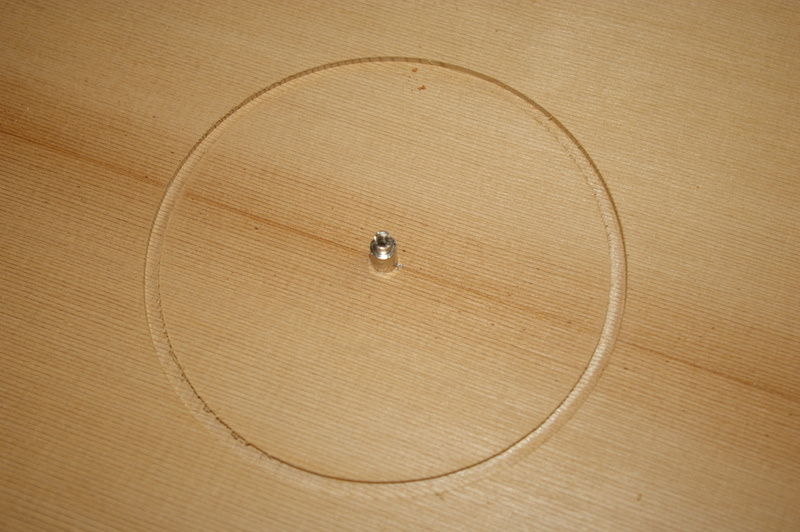
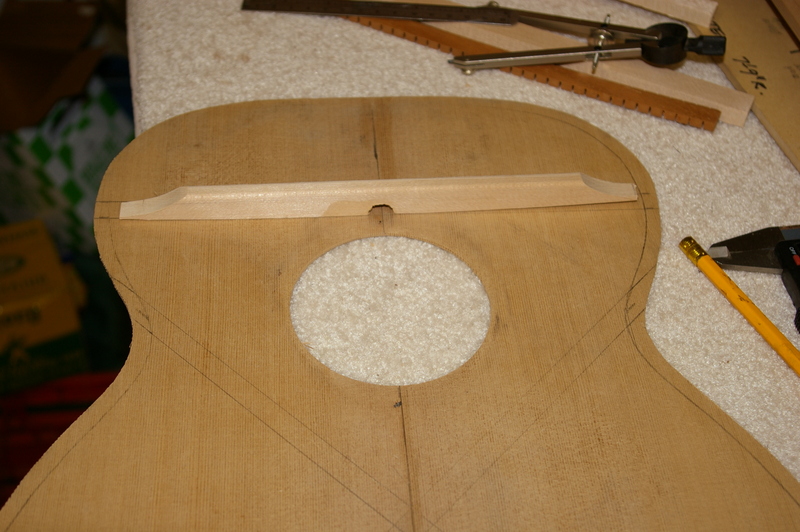
Back to the sound board: next step is cutting the channel for the rosette. This rosette is simple, just four 3ply black and white laminated strips sandwiched together. I have a jig for this, comprised of my Dremel tool, a special base plate and a plywood base with a steel post in it. The channel diameter is set and then cut with a down-cutting spiral bit. I had to make two cuts to get the correct width for the laminated purfling. Then I tapped the 4 plies into the channel which was pre-filled with thick super glue. The purfling was pre-fit and cut dry beforehand of course. A while later when this was all dry I put the top back on the plywood base and cut out the sound hole. First I cut halfway through on one side, then flipped the piece and cut through the other side.
I also sawed up some brace stock from a nice piece of kd hemlock trim I bought for this purpose. It was already 10mm thick, so I simply ran it through the band saw to get the height I needed. I rough sawed them to 17mm. Next step was to draft the curve of the top onto the braces. This design calls for only three braces; the upper face brace which is at the end of the fingerboard, and the main X-brace. I have a curved template for this. I then use the bench sander to grind off the bulk of the wood, then switch to the disc for finishing. With a little practice you can get a perfectly smooth curve this way. All three braces use the same curve, which provides the dome in the top. This dome in turn provides the strength to carry the force of the strings on the bridge.

gluing the top plates, with weights

top plate with circle cutting jig set to go
the rosette channel

purfling strips glued into the channel

rosette after sanding
underside of the sound board, marked for braces
Filed under Guitars

Today’s efforts: neck & fingerboard
To make a guitar you need a few essential tools. The band saw is one. Another is a combination bench sander; the kind with a belt and a disc. This is the quickest and most reliable way to make flat surfaces. To prep the neck today I first band sawed the angle of the heel. On this guitar it is 2.5 degrees, because the top has an arch. Now that the band saw works reasonably well I made the cut fairly precisely and then finished it up by dressing it dead flat on the stationary disc sander. Next I flattened the upper face, to which the fingerboard is glued. Although the three pieces of the neck had flat surfaces to begin with, after gluing they’re never perfect, so the face has to be made dead flat. For this I used the stationery belt sander. After the face was done I marked the break where the fingerboard ends and the headstock begins. More sanding to get right to this line and the neck was ready for the truss rod.
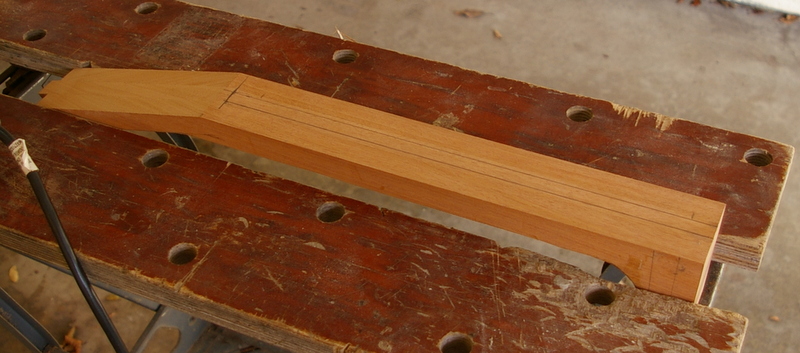
neck clamped in the workmate table
I decided to go with a hidden truss rod. It will have to be accessed from inside the box, but it looks cleaner. To cut the channel for the truss rod I use my 1 HP router. This is very powerful, but it works perfectly if you set it up right and push in the right direction. Once I set up the jig and secured the neck in my Workmate (another essential) I was ready to cut. This took about 30 seconds. Then it was time to do the worst of all jobs: cut the dovetail. I decided to tackle this right away while I had the router out. For this I have a jig with templates for cutting the male and female dovetails. Although the body is not yet made I can still do the neck joint. I use a special tapered bit and a guide collar that fits the router base. The dovetail is 70mm long and 15mm deep.

Dovetail jig

Router and cut slot – the guide is on the far side. Router cuts from right to left, not the other way!

The neck, the hardest parts are done!
Next step, glue the truss rod into the slot with 5 minute epoxy. I like fast epoxy for this, because it only takes two or three minutes to apply the 1/4 ounce of glue required, and it sets up fast. Sometimes regular epoxy needs 24 hours to get super hard, and by that time I’m ready to glue the fingerboard. I mixed up a small amount of epoxy, about one table spoon, and with a tiny art spatula I applied epoxy to the sides of the groove and the sides of the truss rod. It dropped right into place, but the epoxy takes up all the extra space, so it then has to be clamped to fit. Waxed paper (essential), popsicle sticks and several screw clamps do the trick here.

Truss rod with epoxy, wax paper and popsicle stick used as a caul for the clamps
While this was setting I got out my little table saw (essential) and cut the neck and tail blocks from the left over end of the neck blank. Then I switched to the fret saw blade, a special blade that cuts a very narrow slot. I made a sled jig that runs on the saw table for fret cutting. I use a fret scale, which is invaluable for this job. The edge of the fingerboard was planed flat first, then I taped the appropriate scale to the blank fingerboard. A few test cuts set the slot depth at 3.5mm. Then I carefully cut the 20 frets and the zero fret. Once they were done I marked the ends and raised the blade to make the end cuts.

Fret cutting jig, with engraved fret scale
Filed under Guitars

miscellaneous parts – kerfed liners, truss rod, fingerboard, nut blank, fret wire, wood binding, cut our neck blanks

neck blanks glued and clamped
I ordered some parts yesterday from Stewart MacDonald in Ohio. They just arrived this afternoon. Ohio to Memphis to Vancouver to Victoria in 24 hours. Before they arrived I worked on the neck. I bought a nice piece of mahogany at a local shop, but it was warped, so I had to go back and get a straight piece. Earlier I spent several hours adjusting my band saw, which was working poorly. Now it works slightly less poorly. It’s a cheap thing and I’ve had it for years, so I suppose I shouldn’t complain. But I will. I discovered that the table was not flat. I don’t think it warped recently, it’s made of cast aluminum. All this time I had a warped table and didn’t realize. So I spent some time grinding the top of it on my bench sander. Then I adjusted the blade after watching a good video on Utube about this.
So once it was working again I set to cutting the neck blanks. I already had a cardboard template for a 25″ scale, so I used this to trace the outline onto the mahogany blank. The blank was 3.5″ x 3/4″ and 5 feet long. I cut out four blanks, since you can get 2 per 2 foot length. They nest together. The extra length will be used for the neck and tail blocks inside the body. The saw cut better after the adjustment, but still a bit wonky. Next I took the 3 best pieces and set them on the bench with the long flat edges down. The finger board will be glued to this face. Then I liberally slopped on the Titebond type 3 glue, which is waterproof. If you want to be able to disassemble any wood parts, you have to use regular PVA carpenters glue, but for the neck pieces I used glue that cannot be heated or steamed apart. This is for one main reason. If ever the neck has to be removed in future, it gets steamed off at the joint with the body. I’ve seen the seams of the dovetail end of the neck separate a bit after this steaming, so I’m being careful here to ensure that doesn’t happen one day.
Once the glue dries I will shape the neck some more, and install the truss rod.

neck pattern

the neck glued up & clamped
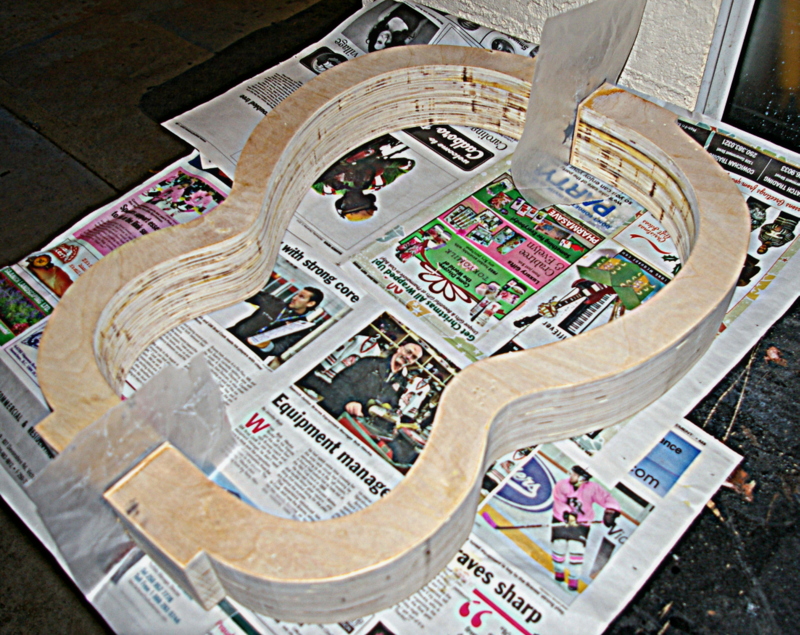
Guitar mold – day 3
The order for my wood is being processed. I buy the wood from a dealer here in BC, and they sand it to my specs. I used to have to sand it myself, which required having a wood shop do it, or a friend. Now I get it done for me, which saves a huge amount of time. They only charged me half an hour labour.
I spent a long time sawing the outer edges of the mold today. My tiny band saw is not made to cut through 3″ thick plywood. But it did, painfully slowly. I sanded it all up and put the halves together. They didn’t mate perfectly, of course, so I sanded the mating surfaces. Then they were a bit short so I added a thin piece of spruce to each end to make up the loss. They were still not mating perfectly, so this time I did what I should have done first – I got out the JB Weld.
I separated the halves with a little waxed paper, and applied a gob of epoxy to the mating surface ends of one half. Then I gently pushed them together, with the whole thing flat on a table. I bought draw catches to clamp the halves together and I will put dowels in to ensure they register properly. 
Filed under Guitars