Monthly Archives: April 2015

Plein Air Countdown T-10

Fountain Lake - Beacon Hill Park - Victoria

Fountain Lake – Beacon Hill Park – Victoria

Yesterday’s outing produce this sketch of Fountain Lake in Beacon Hill Park. The lake was built in 1888 before the park was designed by Scottish landscape architect Blair. I find the abundance of green tones a huge challenge, obviously!

I was also prompted to pull out my Brother 750TR after reading about poet Les Murray and his very similar machine on oz.typewriter. But oz also had a post about typewriters used in the Fuhrer bunker, notably Adlers. I pulled out the Brother and gave it a short workout on the bench to see if there was ink left in the ribbon. Good enough. I carried it up stairs. Then I went to the living room and saw my Adler Tippa behind the couch. Which one to use? I set up the Adler on the table, fed in a piece of 9×12 sketch paper, the closest thing at hand, and just blurted out the first thing that came to mind. Maybe the Brother tomorrow.

another morning

1 Comment

Filed under Painting, Poetry, Typewriters, Uncategorized

Plein Air Countdown T-11

Home Made Camera Obscura

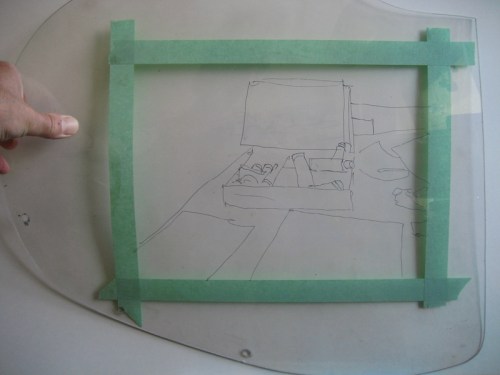
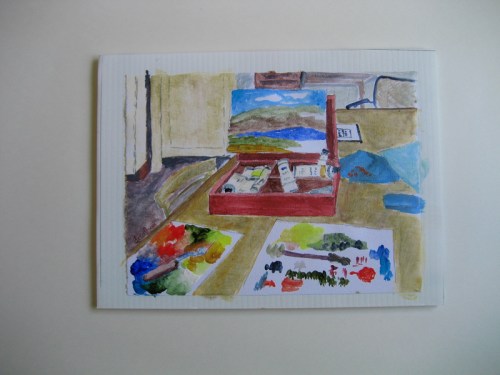
I’ve been thinking about how to improve my perspective – the sketches, not my life, but maybe both..hmmm. In the shop I found the old windshield I made for my long gone Kawasaki 1000 – a thin piece of lexan that I removed when I sold the bike and put the factory windshield back on it. I taped a 9×12 inch frame on it and using a Sharpie pen and one eye I traced what I saw on the table. Then I traced that with sketch paper. Next up, a sheet of carbon paper, and a 9×12 piece of cheapo practice canvas. Another tracing – it was like the ancient past of my life, always tracing things before the days of CAD drawing made architects have to work ten times faster just to keep in the same place. After that it was a mere case of applying paint. Well, the perspective was fairly real. I’m also experimenting with “Golden – Open” acrylic paint, which dries much slower than regular acrylic. It was good to be able to use up all the paint on the palette before it dried.

the finished sketch

the finished sketch

Here’s how I did it. First the old windshield with tape. Then propping it on the edge of the table I outlined the scene with the black marker. The main difficulty here is holding the lexan up. Some kind of stand would be good for field use.

lexan with ink sketch

lexan with ink sketch

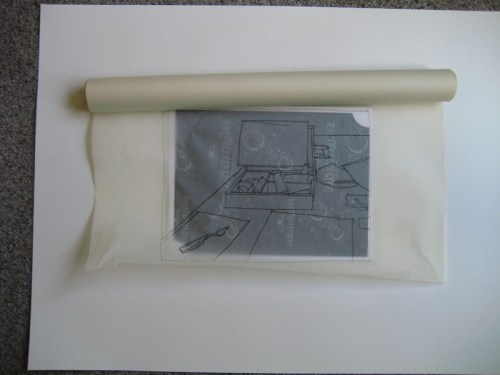
Then the ink sketch was traced onto tracing paper.

trace of a tracing

trace of a tracing

Then the paper tracing was traced onto the canvas support with carbon paper.

tracing onto the painting support (canvas) with carbon paper

tracing onto the painting support (canvas) with carbon paper

Then on with the painting. I taped the cheapo canvas sheet onto a plastic backing with double sided scotch tape.

painting taped to a plastic signboard backing

painting taped to a plastic signboard backing

Of course this sort of “camera obscura” works well at 9×12 and smaller. For larger works you’d need a really big piece of lexan!

1 Comment

Filed under Painting

Plein Air Countdown T-12

old church on a corner

old church on a corner

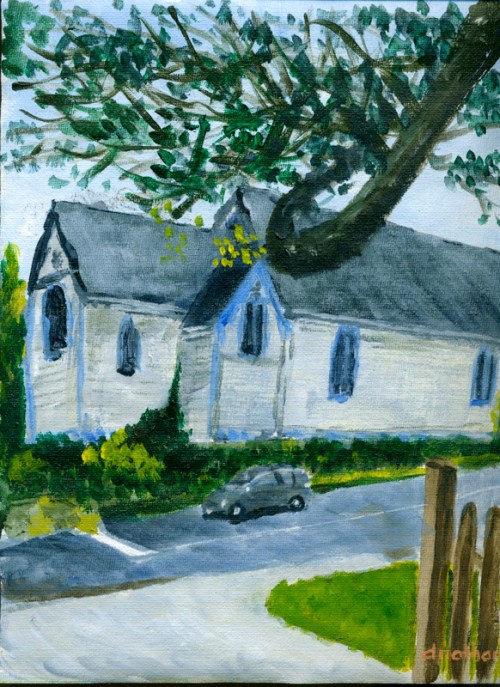
Yesterday I got out for an hour or two again with my paint box, and drove around in search of a site where I could set up and paint a suitable scene. I saw this old church in need of repair, parked the van and walked up and down the street looking for the right angle. There were some good places but I felt too exposed setting up there so I settled on the corner just because it seemed like a neutral place where nobody might stare at me from their front window. Having left it too late, as usual, I only had an hour so I rushed the sketch and it was terribly bad. I went home disgusted with my effort, but with a photo of the scene for reference. Later on I did a better sketch, after having first laid the whole thing out in pencil this time.

sketch 2

sketch 2

Sketch 2 was technically better but it didn’t do anything for me, so I decided to rework sketch 1. It needed a story, so I created one. I think this proves that when you have fun and relax a bit, better results follow.

sketch 1 - reworked with a story added

sketch 1 – reworked with a story added

Leave a comment

Filed under Painting

Plein Air Countdown T-18

Centennial Square, Victoria BC

Centennial Square, Victoria BC

Mothers Day is the annual outdoor painting challenge, in which I am entered once again. The first year I did well and amazed myself by getting 3rd prize. Last year I sucked big time. This time round I’m training hard. I’ve fine tuned my kit and today went out to scope some locations and practice my chops. (Maybe that’s just a guitar player metaphor, but since this is Nathanguitars that’s permissible here, since I make the rules.)

In any case it was windy and cold everywhere I wandered, so I ended up under cover and out of the wind downtown in the main square. It was getting late by this time, so I had 45 minutes to do something. In a way that’s good practice, because with a lot of art endeavours too much time means overthinking and overworking. This time I barely had time to cover the whole 9×12 inches before I had to go. This year they are handing out 9×12 canvas or paper for the event, so that’s what I’m practicing on. This one was done on a piece of loose canvas from a roll, which is cheap and easy to store. I read recently that Renoir did this… so what the heck?

Leave a comment

Filed under Painting

Guitar #30/5

unfinished guitar body and neck

unfinished guitar body and neck

Above you have the carved neck, with dovetail joint, stained ready for finishing. I won’t go into the carving process – suffice to say that it involves removing just right wood. It also should be symmetrical, of course. At the speed I carve it took most of a day to go from a flat blank to what you see. Before that I cut the neck joints, then glued the completed fingerboard to the neck blank. Not quite a miracle but it feels close – the neck joint was an almost perfect fit after cutting. Trial and error – many errors, too. But this time lucky! I stained the neck with ‘dark walnut’ so it would be closer in colour to the body. Then I decided to remove some of the stain in the mid section, leaving the ends dark. This looks good, a bit like a violin.

heel of neck with french polish

heel of neck with french polish

head with french polish

head with french polish

Once again I used shellac to finish the guitar. After many years of practice I’ve got it down fairly well. Basically it just gets rubbed onto the guitar with a pad soaked in shellac, with extra dabs of pure alcohol and a few drops of light oil. Add shellac, alcohol, oil by dribbling onto pad – then rub. There is a technique and lots of instruction on the web. Best tip: use clear sealer shellac, unwaxed.

top showing reflection

top showing reflection

I don’t like filling pores, it’s messy and hardly seems worth the effort. Some pros can fill the pores using fine pumice but I never got far with that. Once I have a decent amount of finish built up I call it a day. French polish is very thin but it doesn’t have to be thick to protect the guitar. More can always be added at any time, too.

a nice tight neck joint

a nice tight neck joint

It didn’t require much work to fit the neck, several thin shims to fill up the oversized cavity, and one strip of blue shop cloth soaked in white glue. I pressed the neck into the body cavity and with a little pressure from a quick clamp it set in snug and tight. To ensure it was drawn down tight to the body however I put a screw into it from inside the guitar. This works better than a clamp and can be removed easily.

clamping the fingerboard  - the screw in the neck block pulls the neck tight to the body

clamping the fingerboard – the screw in the neck block pulls the neck tight to the body

I let this dry overnight. Then I put it all together, which took me most of the day. I previously made the nut from unbleached bone, and cut the slots with string gauged files.

bone nut, string gauge ruler, and string files

bone nut, string gauge ruler, and string files

I reused an old tailpiece made of thick brass plate. I polished it up first with Nevr Dull, a product I remember my Dad had around for ever in the basement. Works great on dull old brass.

brass tailpiece all shined up

brass tailpiece all shined up

Next came the bridge. I was a bit surprised to find that the bridge is taller than expected. Not much, but these things happen, as I have said before. I made a bridge blank then used a pencil on a stick to mark the line for the top of the bridge.

bridge height marking tool

bridge height marking tool

Then I installed the tuners, the nut, the tailpiece and strings. More fiddling with the bridge, including finishing it, and making shallow slots for the strings. This is an iterative process in which the bridge goes on and off numerous times, involving much laborious turning of the tuning heads, and often broken strings. But this time none broke. However I did find numerous buzzes, which required replacement of several frets. There are still some very minor buzzes but for now I will wait and see how it settles down before attempting more adjustments. I used the adjustable truss rod to flatten the neck a tiny bit.

the finished guitar #30

the finished guitar #30

Conclusion: it’s very loud, like the previous one. I strung it with D’Addario EJ83M strings, which they now call ‘Silverplated Wound’. They used to call them ‘Gypsy Jazz’, which was a dumb idea, implying that they were no good for anything else. They’re soft and warm toned, and excellent for any sort of musical style. But these are the heavier gauge, and I find them too stiff for my likes. I’ll probably go back to the same string in the lighter gauge: EJ83L, which I’ve been playing for years on most of my guitars.

I hope you enjoyed this repeat guitar build for the second time in a row. I thought it would be interesting to do it again, if only to compare with the first model “O” process. If anyone is inspired to try building a guitar then I will be very pleased. But remember that it’s probably a bit harder than it looks here.

1 Comment

Filed under Guitars

Guitar #30/4

ribs and linings with glue - ready for the top

ribs and linings with glue – ready for the top

When last we blogged the guitar box was half assembled. I put the back plate on first this time, trying to save a little work by installing the linings at one go. It should have been fine but there was a hitch – the ribs weren’t quite as straight as they should have been, even though they were clamped in place in the mold. Sometimes you have to check things at least three times. This time I only checked twice. So the ribs are a little crooked. When this happens I resist the urge to smash the whole thing and start over. I figure that in time I’ll forget about the mistake and enjoy the guitar despite the imperfections. Then again there are always imperfections – they just vary in degree!

So I glued on the top, and then trimmed the overhangs top and back.

top plate with rubber band clamp

top plate with rubber band clamp

trimming the overhang with the router

trimming the overhang with the router

Next step is to put on the bindings. I taped four pieces together and bent them all at once on the bending iron. Then I clamped them into one side of the mold to dry. I cut the channels in the meantime. The jig was already set for these bindings but after cutting the channels weren’t quite deep enough, and the bindings would have been standing much too proud of the edges, so I adjusted the depth and cut again. Then I began fitting bindings into the channels. Even though the bindings were all shaped to the mold they still required minor adjustments on the bending iron – numerous minor adjustments. So I did these one at a time, gluing on each one and taping it into place before the next one was begun.

bindings after drying in mold

bindings after drying in mold

guitar with bindings glued on and taped tightly

guitar with bindings glued on and taped tightly

After the bindings were dry I removed the tape and began rough sanding the body. Because I’ve had some real problems doing this with power tools I elected to do it this time by hand. That way there’s very little possibility of gouging or finding that you’ve suddenly removed a lot more wood than you should have. I clamped the body using a foam camping mat in the workmate, and spent an hour or two sanding away with 100 grit and various sanding blocks. One very useful tool for this is a 2×4 about a foot long with a piece of heavy sandpaper on one side and a big handle on the back, like a large trowel. I also use some dowels to get into the waist area. I sanded the back too, and the top lightly. It’s surprising how smooth you can get hardwood using only 100 grit sandpaper.

After that I turned back my attention to the neck blank. It’s made up of 3 – 19mm wide pieces, and finished at about 57 mm wide. The headstock has to be wider than that, so I had to add two “ears” to it. Then later I cut it to shape, using a template I made long ago. I’m using the Selmer shape, and the headstock will have slots. I like the look of this, and I prefer the orientation of the tuners this way. They are a lot easier to manipulate on a slotted headstock than on a flat one, because all the shafts and buttons are horizontal. Very ergonomic.

gluing ears on the headstock

gluing ears on the headstock

drilling tuner holes in headstock

drilling tuner holes in headstock

As I mentioned above, I glued the ears to the headstock, then sanded it to thickness and cut out the shape. Next came drilling the various holes and slots. First I drilled holes for the tuners. The best and most reliable method I’ve found is to tack a steel plate from an old 3 on a plate tuner assembly to the side of the head. Then I clamp the headstock and neck to a vertical piece of plywood that is attached to another plywood piece that can be moved around on the drill press table. After drilling the tuner holes I then bored out four 1/2″ holes on the face, and cut out the slots roughly with a power jig saw. Lots of filing and sanding later the headstock is done.

headstock with tuner holes and slots - cut and sanded

headstock with tuner holes and slots – cut and sanded

Next up – the neck angle. Once the body has been all made and sanded the neck angle can be determined. Where the fingerboard sits on the top the surface is usually humped. So it has to be sanded flat. Then the angle is taken with an adjustable square. At this point it doesn’t matter what that angle is, because it’s too late to change it. With luck it should work and allow the correct projection for a bridge height around 15mm. A bit higher or lower is not a serious problem. So I take the angle and then transfer the complementary angle to the neck. If the body angle is 92 degrees, then the neck angle is 88, or 180 minus 92. The adjustable square does the thinking however, no need to do any calculating here. The angle is drawn on the side of the neck at the heel, at the 14th fret – where the neck meets the body, and 15mm beyond – the depth of the dovetail that will be cut.

taking the neck angle off the body

taking the neck angle off the body

complementary neck angle transferred to the neck

complementary neck angle transferred to the neck

The above photo shows the neck with the pencil lines, after I have cut and sanded the end face. Now it’s ready for the dovetail joint to be cut.

1 Comment

Filed under Guitars