
When I was at my aunt’s funeral, about 50 years ago, my Dad whispered to me that there was a guy in the hall who was a bookmaker. It turned out he was my Dad’s step brother, and he had been a millionaire and broke again more than once. I am a book maker too, but of a different sort…

Nanowrimo is over and I have printed my book. I started typing on October 30th with several pages, then began in earnest on November 1st and wrote all the way until December 4th, with but one day off. I wrote over 80,000 words and got a serious back spasm along the way. All the writing was done on manual typewriters, mostly a small group that I prefer; the Hermes 3000 & Smith Corona 5 for desktop portables, and the Hermes Baby, Olympia SF/Traveller, Olivetti Tropical (Hermes Baby clone) & Olivetti Lettera 22 for smaller ones that I use on my lap.
Instead of sending my book off to a POD house for printing, I decided to make my own book for the first copy anyhow. I checked out some videos on book binding and researched how to set up a printer to print signatures. I wish I’d known this earlier! It’s not difficult and very enjoyable. I printed the book at half letter size, 5.5 x 8.5 inches precisely, so the signatures are printed 4 pages to a letter size sheet. The PDF print driver allows this to be done and all you have to do is set the number of pages in each signature. I set mine to 5 pages, and then printed 20 pages at a time to fill the five sheets on two sides. You could go ahead and print the whole thing at once however, but then you’d have to sort the signatures afterwards. You need a laser printer that will duplex, I should add.

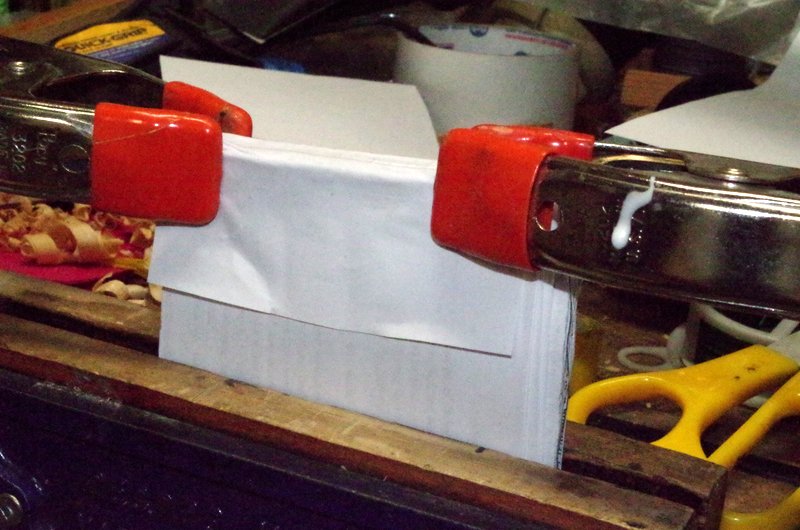
Rather than hand stitch, which was taking too long, I decided to sew the signatures on a sewing machine, which went through 5 sheets of paper with ease. My book has 230 pages, which means I should have made 12 signatures of 20 pages each to end up with an even number of sheets. The last signature had fewer sheets, so I added another signature at the end to make up a few blank pages for the cover, and for any correction notes, etc. These next pictures are an example using scraps to show the process.

With the signatures together in order I clamped them and glued the spine with a sheet of paper wrapped down the front and back an inch, using white PVA glue. Then I glued on a heavy card cover to the front and back sheets, but not the spine, and clamped it to dry between two boards. So far it is holding up and looks like a real book!

A better job can be done if you wish to make a fine book, complete with cloth cover. The proper way is to sew the signatures together, but I didn’t bother since I just wanted a copy to read and edit, and didn’t wish to make a work of art for my purpose. If you research bookbinding you will discover there are many more steps that can be done to make a fine book, but for just a sketch or note book this method here will do well enough.


Nice job, that’s so cool. I’m going to look up this printing sequence. Usually I just bind loose A5 singles like a paperback for correcting drafts and it works quite well. (I used to bind them as A6 but the print was way too tiny!) I score the spine edges and lay binding threads in the scores, and lather the spine in lots of flexible pva. The blank facing pages are useful for notes but it does mean I end up with a hefty paperback! I started making my own sketchbooks at art school (in the 90s) when I couldn’t afford fancy water colour sketchbooks, then made all my own sketchbooks, progressed to artists books and finally taught myself fine binding in 2008, using an old fifties teaching manual (boys learned it in school, not girls, of course!) Once you get the bug it never leaves you!